Chain Types Explained: O-Ring, X-Ring, and Standard
Your motorcycle's chain is a precision component that transmits engine power to the rear wheel. Understanding which chain type your bike uses is the first step to proper maintenance. The three main types are standard (non-sealed), O-ring, and X-ring chains.
Standard chains are the oldest design, consisting of pins, rollers, and side plates with no internal seals. They're lighter and cheaper but require frequent lubrication and adjustment. These are typically found on smaller-displacement bikes, vintage motorcycles, or off-road machines where weight savings matter. Without seals, dirt and moisture easily enter the pin-bushing interface, accelerating wear. Expect to replace a standard chain every 8,000-12,000 miles with diligent maintenance.
O-ring chains revolutionized chain longevity by incorporating small rubber O-rings between the inner and outer link plates. These rings seal factory-applied grease inside the pin-bushing area, drastically reducing friction and wear. Most modern street bikes from 250cc upward use O-ring chains. The trade-off is slightly higher weight and drag, but the lifespan jumps to 15,000-25,000 miles.
Key Stat: A properly maintained O-ring chain can last 20,000+ miles, while a neglected one may fail in under 8,000 miles -- regular cleaning is the single biggest factor in chain life.
X-ring chains are an evolution of O-ring technology. Instead of a round cross-section, the seal has an X-shaped profile that reduces friction by 30-50% compared to O-rings while maintaining the same sealing effectiveness. The X-ring design also resists twisting, which means less heat buildup and longer seal life. High-performance sport bikes and adventure bikes often come with X-ring chains from the factory. They cost more but deliver the best combination of longevity and efficiency. To identify your chain type, look at the side plates: O-ring and X-ring chains have visible rubber rings between the plates, while standard chains do not. Your owner's manual will also specify the chain type and size (e.g., 520, 525, or 530 pitch).
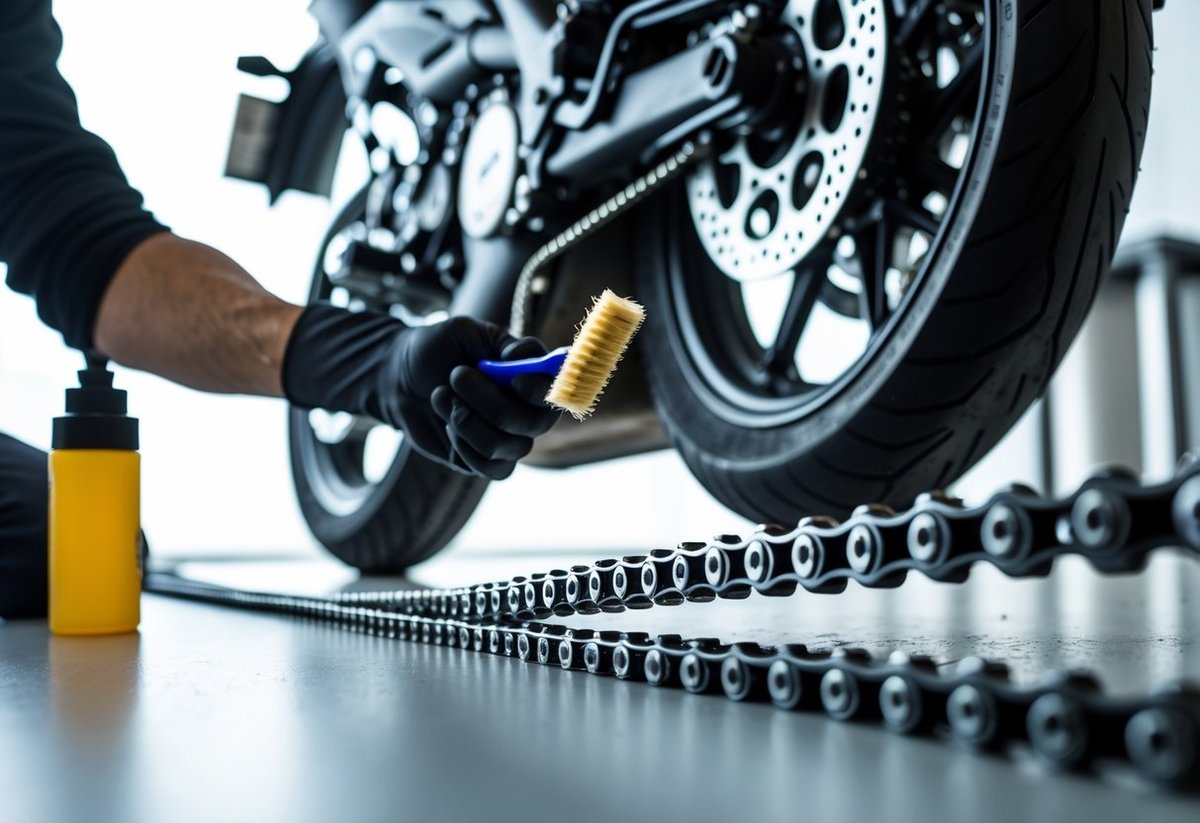
Step-by-Step Chain Cleaning Process
Cleaning your chain is messy but essential. A clean chain allows you to inspect for wear, ensures proper lubrication penetration, and prevents abrasive grit from grinding down pins and sprockets. Here's the professional method used by top mechanics.
Tools and Products Needed: You'll need a rear stand (or paddock stand), a chain cleaning brush (three-sided brushes work best), a spray chain cleaner or kerosene, a clean rag, and nitrile gloves. Avoid using gasoline or brake cleaner -- gasoline is dangerously flammable, and brake cleaner can damage O-rings and X-rings. Dedicated chain cleaners like Motul Chain Clean, Maxima Bio Wash, or simple kerosene are safe and effective. Kerosene is cheaper and works just as well as branded sprays, but it smells stronger.
Step 1: Stabilize the Bike. Place the motorcycle on a rear stand so the rear wheel spins freely. Never clean a chain with the engine running or the bike in gear. Shift into neutral and ensure the bike is stable.
Step 2: Apply Cleaner and Scrub. Spray the chain cleaner liberally onto the entire chain while slowly rotating the rear wheel. Let it sit for 3-5 minutes to dissolve old grease and grime. Using the chain brush, scrub each section of the chain -- focus on the side plates where dirt accumulates. Rotate the wheel to access all sections. For heavily caked chains, a second application may be necessary.
Step 3: Wipe Clean. With a clean rag, wipe the chain dry while rotating the wheel. Remove all cleaner residue and dissolved dirt. The chain should appear clean and dry, with no visible grit. Common Mistake: Many riders skip the drying step and apply lube to a wet chain. This traps moisture and cleaner residue under the lube, accelerating rust and reducing lube effectiveness. Always let the chain dry completely for 10-15 minutes before lubricating.
Step 4: Inspect. While cleaning, look for tight links (links that don't pivot freely), rust spots, missing O-rings, or uneven wear. If you find any of these, replacement is likely needed. A chain with tight links will cause jerky power delivery and accelerated sprocket wear.
Lubrication Guide: Wet Lube vs Dry Lube vs Wax
Choosing the right lubricant depends entirely on your riding conditions. Using the wrong type can actually attract dirt and accelerate wear. Here's how to match lube to your environment.
Wet Lube (Standard Chain Lube): This is a thick, sticky oil-based spray that clings to the chain. It's ideal for wet or rainy conditions because it resists washing off. The downside: it attracts dust and road grime like a magnet. If you ride in dry, dusty areas, wet lube will create a gritty paste that wears your chain faster. Use wet lube only if you frequently ride in rain or on wet roads. Apply it after every 300-500 miles or after any ride in rain.
Dry Lube: Dry lubes are typically wax- or PTFE-based solvents that evaporate, leaving a thin, waxy film. They don't attract dirt, making them perfect for dry, dusty conditions like desert riding or summer street commuting. Dry lube penetrates well and reduces friction, but it washes off easily in rain. Reapply every 200-400 miles in dry conditions. Many ADV riders carry both wet and dry lube and switch based on the forecast.
Chain Wax: Chain wax is a semi-solid wax that sprays on as a liquid and dries to a waxy coating. It offers the best of both worlds: it doesn't fling off like wet lube, and it repels dirt better than dry lube. Chain wax is the most popular choice for street riders who encounter varied conditions. It provides excellent protection against moisture and corrosion while staying relatively clean. Apply wax after every 400-600 miles, or after washing the bike. Allow 30 minutes for the wax to fully dry before riding.
Application Technique: Regardless of lube type, apply it to the inside of the lower chain run (the side facing the rear sprocket). Spray a small amount while slowly rotating the wheel, covering each link. Let it penetrate for 5 minutes, then wipe off any excess from the outside of the chain. Excess lube on the outside only attracts dirt and flings onto your rear wheel and swingarm. Less is more -- a thin, even coating is far better than a thick, goopy layer.
Chain Wear Measurement and When to Replace
Even with perfect maintenance, chains wear out. Riding with a worn chain damages sprockets and can lead to catastrophic failure. Here's how to measure wear and know when it's time for a new chain and sprocket set.
Measuring Chain Stretch: Chains don't actually stretch -- the pins and bushings wear, creating slack. To measure wear, use a chain wear indicator tool (available for under $20). Place the tool on the chain at several points. If the tool drops into the chain beyond the wear limit mark, the chain is worn out. Alternatively, measure 12 chain pins (from the center of one pin to the center of the 12th pin). For a 520 chain, the new length is 6.0 inches; replace when it reaches 6.04 inches. For 525 and 530 chains, the new length is 6.0 inches; replace at 6.05 inches. These small differences represent significant wear.
Sprocket Inspection: Always inspect sprockets when checking chain wear. Look at the teeth: a new sprocket has symmetrical, slightly hooked teeth. Worn sprockets develop a hooked or pointed shape on the drive side of each tooth. If the teeth look like shark fins, replace immediately. Also check for missing teeth, bent teeth, or uneven wear across the sprocket. A worn sprocket will accelerate chain wear and vice versa -- always replace chain and sprockets as a set. Mixing a new chain with old sprockets will cause rapid chain wear and poor performance.
When to Replace: Replace your chain and sprocket set when any of these conditions exist: chain wear exceeds the manufacturer's limit, sprocket teeth are hooked or worn unevenly, the chain has tight links that can't be freed, or the chain has visible rust or damaged O-rings. Most riders get 15,000-25,000 miles from a quality O-ring or X-ring chain with regular maintenance. If you ride aggressively, in dirty conditions, or neglect cleaning, expect 8,000-12,000 miles. Budget $150-$400 for a quality chain and sprocket kit, depending on your bike model. Installation is a moderate DIY job requiring a chain breaker and rivet tool, or you can pay a shop $100-$200 for labor.
Final Tip: Set a reminder to clean and lube your chain every 400-600 miles, or after any ride in rain or dirt. A clean, well-lubricated chain not only lasts longer but also improves fuel economy by reducing drivetrain friction. Your bike will thank you with smoother power delivery and fewer unexpected repairs.